| Floyd
Rose type floating tremolos...
These can cause all sorts of problems for the
musician who does not fully understand the physics behind the system.
With a little knowledge, setting up your Floyd is straightforward.
How does it work?
The secret behind the whole system is BALANCE.
The tremolo is "floating" i.e.. not fixed to the guitar body
and acts like a seesaw with the strings pulling it forward and the springs
in the back of the guitar pulling it backwards so the tension of the strings
MUST equal the tension of the springs to keep the trem in balance. This
is why the whole thing goes out of balance if you break just one string
or if you fit strings of a heavier or lighter gauge.
When do I need to set-up my trem?
- If you want to fit strings of a different
gauge to the ones fitted now
- If you need to tune your guitar to a different
pitch
- If any part of the trem has been adjusted
- If your mate
has messed around with it!
How
do I set my trem up from scratch?
- If you are
completely starting from scratch due to one of the reasons above, remove
all the strings and take advantage
of this moment to clean the fretboard and polish the frets.
- The idea now is to block the trem in a level
position so it doesn't move while strings are being fitted and tuned.
- Tilt the trem forward and wedge something
under the fine tuners (the plastic cover off the rear spring cavity
is often just right!) between the trem and the body of the guitar which
is just thick enough to hold the trem in a position perfectly parallel
with the top of the body. Tighten the springs in the rear cavity a couple
of turns (or add an extra spring) so that the wedge or plate is held
firm and doesn't fall out when you start tuning the strings up to pitch
later.
- Fit your new strings and tune up to pitch
using an accurate electronic tuner. It is then VITAL that you "stretch-in"
each string thoroughly by tugging on it and re-tuning until it is stable.
If this is not done, the guitar will NOT stay in tune when locked up.
If the plate you used to hold the trem level drops out at this point,
tighten the springs in the rear cavity a little more and re-fit the
plate under the trem.
- When you are sure everything is in tune,
stretched-in and stable and the trem is being held perfectly parallel
with the body, lock the strings at the nut using only enough pressure
on the allen wrench to pinch the strings firmly, DO NOT OVERTIGHTEN!
After all of the strings are locked check the tuning again and if any
have gone only very slightly sharp or flat, retune with the fine tuners.
But if more than a half a turn or more is needed to fine tune a string,
slacken the nut clamp and retune with the machinehead instead. (TIP:
Sometimes you might find that one particular string goes considerably
sharp or flat every time the nut clamp is tightened, in this case, if
for example it goes sharp every time, loosen the nut clamp and retune
that string a little bit flat so when you tighten the nut clamp it will
come "up" to tune as you tighten.
- Once everything is locked and in tune, you
now know that if the trem is level, the guitar will be in tune.
- Remove the plate holding the trem level,
the trem will drop back and everything will go pear shaped... but don't
worry... and DO NOT ADJUST ANYTHING. All you have to do is loosen the
springs in the rear cavity and as the trem levels off, the strings will
fall into tune.
- To do this hold the guitar in "playing
position" ...NOT lying flat. Loosen the springs evenly half a turn
at a time until the bottom "E" string (the thick one) comes
into tune, this one is the most sensitive so when it is in tune, all
the others should be too! Finely adjust the springs until all the strings
are perfectly in tune. You should NOT have to touch the fine tuners
at this point if the guitar was perfectly in tune at step 6.
- Job done... replace the rear cavity plate and enjoy!
What about just changing the
strings?
If you are just changing your strings and as
long as everything is in balance before you change them, there is no need
to adjust anything. The easiest way is to change each string individually
and only unlock the nut clamp for the string you are changing, replace
that string, and fully stretch it in and retune to pitch before touching
the next one.
Lock each nut clamp and make sure the pair you just changed are perfectly
in tune before unlocking the next clamp. When finished, you might need
to fine tune just a little... but not a lot!
If, on the other hand, you want to remove ALL
the strings (to clean the fretboard for example), just wedge the trem
level before you start to tune up the new strings (don't forget to stretch-in)
and in theory, as you bring the last string up to tune, the plate should
just drop out and all will be in tune. But things don't always go this
well and you might be better off following the instructions in "How
do I set my trem up from scratch?"
Truss
Rods?
They are not all the same
Virtually all guitars
today are fitted with a Japanese type "Aluminium channel" type
rod. The adjusting rod comes pre-fitted into a box section length of aluminium
as a complete unit which is then simply dropped into a channel cut into
the neck and the fingerboard is then glued on the top. This is an extremely
cheap and efficient method of making necks. Unfortunately it also makes
a neck with hollow cavities that lacks resonance, tonal quality and ridgidity.
This is one of the main reasons that expensive guitars sound so much better
than identical, less expensive ones.
The better quality guitars
are generally fitted with "traditional threaded rod" type of
truss rod originally invented for Gibson USA. These are made by lining
a rod with tape or a sleeve to stop it rattling inside the neck and fitting
it into a curved channel cut into the neck with cutouts for the anchor
points for each end of the rod using special templates and jigs. It is
time consuming and difficult to do but results in a neck with vastly superior
tonal benefits and ridgidity due to the total lack of airspace inside
the truss rod cavity. Guitars will generally only have this type of rod
if they are at the upper end of the market but one dead givaway is if
you have a solid maple Strat type neck (no seperate fingerboard) with
a 6mm wide "skunk stripe" down the back. The stripe is where
the rod was fitted in from the back and channel type rods are twice as
wide as that, so it will undoubtedly have a traditional style rod... but
only if there is NO SEPERATE FINGERBOARD. Basically, if it also
has a glued on fingerboard the skunk stripe is purely for show!
There are other variations
of truss rod sometimes used in quality instruments such as: The double
truss rod used in some basses, the twin bar rod used in some Rickenbackers
and the dual action "Bi-Flex" rod used in top draw Fender Strats
and other expensive guitars which can adjust both ways.
...wossit for?
The biggest misconception regarding truss rods
is that they are used to raise or lower the action (the string height).
While adjusting it does actually alter the action slightly, this is simply
because adjusting the rod actually BENDS the neck!
It is made up of a curved rod set into a channel
running through the length of the neck. When you fit strings to the neck,
the tension (maybe 100lbs or more) pulls the neck forward into a slight
bend, this bend is referred to as "neck relief". The truss rod,
when tightened, tries to straighten inside the neck, thus pulling the
neck back against the string tension. The theory being, that the neck
ends up straight again.
In practice however, all guitars are different.
Some like to have a little bit of "relief" and others play better
with a dead straight neck. Although the truss rod is a very simple device,
the truth is it can be the most destructive part of a guitar if adjusted
by a novice.... yet most guitars usually come supplied with the tools
necessary to do the job!
Buzzing
Frets?
Generally speaking, before calling your guitar
technician (me), if your guitar is buzzing on the first four frets but
nowhere else, then the truss rod probably needs loosening a little. If
it buzzes around the sixth to the twelfth frets (and ALL in between...
not just one or two) it probably needs tightening a little. If however,
you have buzzing on individual frets or adjustment doesn't help, the frets
probably need more attention from an experienced luthier (me again!).
Sometimes you might find that when you bend strings on your guitar, the
note "chokes out" on the next fret. This is because when the
string is bent it is travelling across the curved fretboard and
therefore it is having to travel "over a hill" as it approaches
the centre of the fretboard. Very often uneveness at the last few frets
can make the problem worse. Also, guitars with a heavy camber to the fretboard
(eg. Strats and Teles) are more susceptible to this problem. It can, however
be sorted with some judicious fret dressing!
Also see Setups
Strange
Vibrations?
If you have a strange hollow sounding vibration
when picking certain notes on the frets (which might come and goes as
you flex the neck), this strongly suggests a rattling truss rod inside
the neck. It can be fixed but the work is a little involved although not
necessarily expensive
BUT SERIOUSLY...
Unless you have a full understanding of the
physics behind truss rods, they are best left alone. But for the "compulsive
tweakers" among you, adhere to these few words of advice......
- Do NOT under ANY circumstances
turn the adjuster more than one-half turn either way
- Do NOT force the adjuster
if it is tight, you might split the neck open or break the rod! (Click
here to see results!)
- STOP!.. if you hear
cracking or crunching noises
- Use the CORRECT size
tool to fit the adjuster... if you mash it up, replacement of the rod
is extremely expensive... even if it's a cheap guitar.
- DO NOT try to adjust
the action with the truss rod.
Cleaning
guitar, frets and fretboard?
Why should I? !
Basically, clean frets give a clearer tone and
a generally clean fretboard stops your strings from getting gungy and
therefore, last longer. It also costs less to have the frets dressed when
it becomes necessary... if the luthier doesn't have to scrape the fretboard
clean first!
A clean guitar is easier to maintain... and believe me, it smells better
too! Just think of how long that thing is stuck under your armpit.
What do I use?
For bare wood fretboards, there are all kinds
of cleaners and conditioners on the market today and they are all very
good. But, they are different. The fretboard benefits from an occasional
clean with lemon oil which cleans and nourishes
the wood but it will deaden the strings quickly so it should only be used
with the strings removed. Some brands work best if left to soak in for
a while... some must NOT be allowed to soak in at all... so read the instructions!
Frets can be cleaned with metal polish such as Brasso
and buffed up nicely! This does not make a mess of the fretboard like
you would expect, but clean the fretboard with fretboard oil of some sort
afterwards anyway (this also prevents the frets tarnishing).
One of my personal favourites is Dr Ducks Axe Wax
this is excellent for use on just about every part of the guitar
and it even claims to clean strings... but I'm not so sure about that
bit! The important thing is... USE IT SPARINGLY.
No 1 Fingerboard Oil is another really excellent
product sold by most guitar shops and is easy to use.
The most effective way, by far, of keeping a
guitar clean and fresh, believe it or not is to wash your hands before
each use. All that muck and grime you see on the fretboard is a combination
of sweaty grease, dead skin and... DRIED BOGEYS.. I got enough off a customers
guitar once to fill an egg cup......AARRGGH!
I always wash my hands with a nail brush before fitting new strings to
a guitar on the bench. This ensures the strings are fresh when the customer
takes it away.
Tuning
Stability Problems?
What could it be?
There are many possible reasons for instability
in tuning some are easily sorted, some are more complex. Below are a selection
of the most common reasons, the ones in black.. you can probably sort
out yourself. The ones in green.. you might have to leave to an experienced
technician.
- Strings sticking in nut - lubricate with
pencil lead
- Old strings - change for fresh ones
- Loose neck (bolt on) - tighten screws
- Strings not stretched-in properly - stretch
in
- Too much or not enough string wrapped around
machinehead - re-wrap with 2 to 3 wraps
- Intonation adjusted
incorrectly
- Action too high
- Nut height incorrect
- Trem sticking, fouling
body or knife edges worn
- Neck loose (fixed neck
guitars)
- Machinehead mounting
screw holes stripped
- Frets worn flat
- Nut cut incorrectly
- Truss rod adjusted
incorrectly
- Worn machineheads
- Excessive string angle
over bridge saddles or nut
Stringing-Up
Tips - general
Wrapping
more string around the machinehead won't
help tuning stability... in fact it will make it worse!
And as far as tying the string in a knot on the machinehead, or feeding
the string through the machinehead hole two or three times is concerned...
forget it!! Can you imagine Clapton's guitar tech trying to make a 30
second string change after he tied the last ones on in knots? No way!....
It can take 15 minutes and a pair of pliers to get knotted strings off
a guitar!
Instead, wrap them TIGHTLY
around the capstan with no more than two
turns for the wound strings and three
for the plain strings with no crossing or loose loops, then stretch
the strings in by tugging on them gently and re-tuning, repeating the
process until the string becomes stable. They will not slip.... I promise!
If you would like to know a method of making them lock on the capstan
when tuned up, feel free to contact me on 07912
655517... I can't describe the method but I would be more than
happy to go through it with you in person for only £12.00 including
strings. (E.Balls or D'Addario)
You will
have heard that it is not good practice to remove ALL the strings at once...
This is not necessarily true and in my humble opinion, only really applies
to the finest and most delicate of classical guitars.
Modern guitars (I mean since about the seventies!) are pretty robust animals...
particularly electric guitars. And virtually ALL maintenance carried out
by a guitar tech necessitates removing all the strings. For example, to
carry out inspection/maintenance inside an acoustic guitar, to remove
pickups on acoustic AND electric guitars, to change machineheads, dress
frets.... even just to give the fretboard a good clean!
The trick is, I suggest you put them back on as soon as you have finished...
and make sure the instrument is kept at a constant pitch... in its case...
when not in use.
Acoustic
Guitars:
If the bridge
pins pull out every time you try to bring the string tension up to pitch,
a common misconception is that this is caused by the pins being too loose
and I see all kinds of efforts to make them stay in... from bits of paper
stuffed in the hole to oversized pins forced into the bridge... one guy
actually GLUED the bloody pins in! (Ahem!) STOP, they are MEANT to be
loose! The ball end should rest against the SIDE of the pin inside the
guitar causing a wedging effect when the string is brought up to tension.
If the pin pulls up every time you try to tune up, the ball end on the
string has got itself caught on the END of the pin!
The cure? Just make a little curl in the end of the string before poking
it down the hole. This ensures the ball-end sits against the side of the
pin instead of getting caught up on the end.
If you have an Ovation or Takemine
with the "string through back of the bridge" style bridge (which
don't need bridge pins), you may sometimes find it difficult to get the
pointy end of the string end to go through the hole and over the saddle
without getting caught. First, just pull the first couple of inches of
the string, at an angle through tightly pinched forefinger and thumb.
This puts a slight curl in end of the string (like a sailmakers needle)
making it easier to feed through the hole.
Electric Guitars:
Apart from the first part of this
section.... Pretty straightforward really! Unless you have a locking trem
of course. If you do, have a look at FLOYD ROSE
trems at the top of the page if you have one fitted to your guitar...
and DON'T tighten those locking nuts and bridges more than a pinch!
All Guitars:
I am amazed at how often I see players who don't have any clue whatsoever on how to apply the strings to the machinehead. One unbelievably common technique I see is to pull the string tightly through the hole in the machinehead and then the loose end is just wrapped around the post two or three times. Please understand that when the string is fed through the hole, any part of this string that is now on the "dead" side of the post (ie, the loose end) is redundant and plays no part in tuning stability... and should be cut off.
The string should be fed through the post leaving enough slack to WIND the machinhead up until about 2 - 4 turns are TIGHTLY wrapped around the post.
LEAVING BIG COILS OF STRING ON HEADSTOCK:
Another very common myth is the technique of leaving the excess string ends neatly wound into ridiculous looking little coils on the headstock instead of cutting the excess off. This is a popular fad from the 80's, the theory being that if your string snaps, you have a spare bit on the end! This is pants!
If the string breaks, it is going to be on the "live" side of the machinehead which effectively means your "little coil" has snapped off anyway! Also if the string snaps at the "bridge" end of the guitar, this "coily" technique wont help you in that case either unless you can find the lost ball-end and re-wrap the string around it (VERY TRICKY).
I have a foolproof and 100% guaranteed alternative.... carry a couple of spare strings and a little pair of snips!
Guitar
is hard to play?
Why is it so hard to fret the
strings properly
Usually, this is the result of the action (string
height) being too high and could be due to one of... or a combination
of the following: The nut may be too high, the action may be set too high,
the truss rod might be adjusted badly, the guitar may have been assembled
badly.
With some acoustic guitars, the neck could be badly lined up with the
body. This is sadly quite common, and any consciencous guitar shop would
send it back to the factory... many just try to adjust it.
It is very rare that a guitar is difficult to
play due to just one problem. It is nearly always a combination of several
factors and these would probably have existed since the guitar was new.
Most of these problems can usually be remedied relatively easily, so call
me to arrange a visit and I'll check it out at no obligation.
Also see Setups
Electrical
Problems?
Can it be Dangerous?
Lets start by clearing up one misconception!
An electrical fault in a guitar is about as dangerous as dropping your
McVitie's digestive in your cup of tea! There is no "electricity"
to speak of, in a guitar. The only voltage in a guitar is produced from
the vibration of the string over the pickup and is not even enough to
make a flea's hair stand on end.
The stories you hear of people getting electrocuted on stage etc. are
usually a result of incorrect wiring in the amplifier or it's supply lead
(the plug!)
Also, in countries where equipment can be plugged into "two-pin"
wall sockets either way around, its possible for your body to complete
a "live circuit" if you touch two pieces of equipment (e.g..
microphone stand & guitar) at the same time if one is plugged into
the wall in opposing polarity to the other!
Anyway, in my experience as a repairer, more
guitarists are killed by wives hitting them over the head with the guitar
than by any electrical problem I know about. So if you get killed by your
guitar.. don't come complaining to me!
My guitar buzzes electrically,
what's wrong?
Most guitars will have a very slight electrical
buzz in the background, it's just interference being picked up from electrical
appliances and lights etc. The guitar acts like a sort of aerial which
uses your body to shield it. So if the buzz reduces greatly, or even disappears
completely when you touch the strings or a metal part of the guitar, then
this is normal and is not a fault.
If however, it is quite loud or it gets worse when you touch the guitar,
there's probably a fault in the wiring somewhere or you may have a possible
faulty switch or control pot. PLEASE NOTE that it is NOT possible for
a guitar to have a dangerous electrical fault... unless you are stupid
enough to plug it directly into the mains supply!!
It's totally dead!
This is usually caused by a signal wire shorting
out on an earth point inside the guitar somewhere, most commonly this
happens on the jack socket as a result of it getting loose and spinning
around.
Nearly all electrical problems are easily and
cheaply fixed... many while you wait. There is always the possibility
that you have a faulty pickup but this is extremely rare unless it has
been physically damaged by someone and can prove a little more expensive.
It should be noted that if you have LACE SENSOR
pickups fitted to a Strat, there seems to be a growing problem that can
occur with these. They can just go dead without warning and is caused
by the resins inside the coils eventually attacking the windings and damaging
them. If your guitar is outside warranty, you can try approaching the
Fender distributors in UK about it but in my experience they are totally
unhelpful with respect to this and deny that any problem exists. Fender
USA, on the other hand are VERY understanding and seem to take a more
sympathetic view on this and I have seen them replace pickups well outside
the warranty period. (After all, they should last 30 years!)
I always recommend replacing them with a set of Custom Pickups, you could
check out my Pickups Page for more details of what's available.
The
controls make crackly scratchy sounds
Common problem this.
Usually just dust or sometimes rubbing compound powder (from polishing
the paintwork at the factory) getting inside the guitar and into the controls,
oxidisation on the jack socket and tracking surfaces in the controls and
switches is also common , and also a build up of static in the controls
where a lot of plastic or nylon parts are used can be a problem in modern
instruments.
This is easily cured with a squirt of an electrical contact cleaner such
as SERVISOL SUPER 10 available from electronics
shops and some guitar shops and is worth it's weight in gold, works on
amps too.... every guitarist should have a can!
If this doesn't cure it, the controls are probably
worn.. or just plain cheap! Give me a ring.
Acoustic
guitar creaking noises?
The body groans!
Quite common in a lot of guitars. The internal
bracings can come loose either from age, dried up glue, not enough glue
or from shock or vibration. The result is a loss in general tone or strange
noises when played, or you might notice creaking and scratching noises
when the guitar is flexed or pressed.
This is reasonably straightforward to repair and is something I try to
identify and correct as part of a CLASS
A setup or REFRET.
It is easily identified by an experienced luthier
who will usually give you a fixed quote on the spot. Contact me if you
would like me to check yours out.
Clonking noises in acoustic guitar
This is nearly always due to one particular
problem.... A half a chocolate digestive biscuit inside the guitar, it's
always HALF of one though. The reason for this is simple, when you are
practicing at home and you have your mug of tea and you pack of biccies,
an idea for a tune comes into your head, you have a biccy in your hand
so you stick the biccy between your teeth and start playing, as soon as
you hit a wrong chord you bite the biscuit and half of it clatters over
your guitar and disappears. After you have spent ten minutes crawling
around the floor trying to find it, you give up and carry on.
Then, I find it inside the guitar six months later.... weird, but true,
and surprisingly common!
Structural Damage?
AAGHH!..
Headstock broken!
DONT PANIC! This is probably the most common
repair of any experienced luthier. Particularly GIBSON LES PAUL's. They
are heavy and mahogany is about as soft a hardwood as you can get in a
guitar! They can break of with very little effort.
Luckily, they glue back on just as quickly (in the right hands!) although
the repair will always be slightly visible... unless painted over with
a "solid" colour of course. But if you are lucky, and the head
is still attached, the repair (if done immediately) can be almost invisible...
and cheap too!
Remember, the quicker it's repaired... the cheaper it is to do!
A simple "glue it on and smooth it over repair" on a cheap guitar
is... well, cheap! The expense is in the refinishing, so this is usually
reserved for expensive or new instruments. It's up to you. Either way,
the repair is structurally solid and at least as strong (or stronger)
as it was before, so no need to worry about a weak headstock!
These points are important if you have a broken headstock...
- As soon as it breaks, loosen the strings
as soon as possible
- If you have the correct tool, slacken the
truss rod off completely to relieve strain on the open fracture.
- Try not to move (if still attached) or damage
broken surfaces
- Carefully search for and keep safe, any small
pieces that have fallen off... including bits of laquer.
- Protect any pointed or ragged edges of the
break from further damage, this is vital to the quality of the appearance
of the final repair
- GET IT REPAIRED IMMEDIATELY if possible.
Even if left for as little as a few days, the two parts can expand or
contract at different rates due to moisture and make it almost impossible
to get a smooth joint.
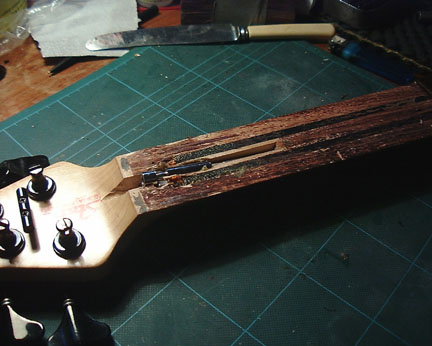
Split Fingerboard?
A common problem with all types of stringed
instrument, often caused by incorrect use of the truss rod! Many .. so
called.. "guitar technicians" will try to adjust the action
(the string height) by adjusting the tension on the truss rod. While this
is technically possible, it is most definitely NOT the way to do it. The
truss rod's function is purely to BEND the neck backwards to counteract
the tension of the strings in order to keep the neck straight. It will
most certainly cause damage of the highest degree if used for any other
purpose!
Amplifier
Problems?
A Cautionary Note First!
As the saying goes... "A little
bit of knowledge can be a dangerous thing!"
An amp repairer gave me this piece of advice... "People delve
into (In the case of valves) very high voltage circuitry and end up doing
some very dangerous modifications. I have them come into the shop on a
regular basis along the lines of "My amp worked ok until I took the
back off and.............."
" One of the shops I deal with had a faulty amp that came in, this
amp had a car radio fuse holder dangling from the chassis which was being
pinched by the edge of the metal chassis. The cables by the way, are carrying
the mains voltage for the amp! Instant electrocution if ever the earth
wire was disconnected. It turns out the fuse kept blowing so the customer
thought the obvious thing to do was not to find out why this was happening...
but to wire in the fuse so that you had easy access to it every time it
blew..............Duh!"
I have to admit to making a similar cock-up with my
Marshall amp... and learned the hard way! I decided I didn't like the
rubbishy plastic sockets on my amp so I replaced them with good quality
metal ones (Ken already begins to cringe as he reads that part!) When
I switched it on...... BANG!... BIG time!..
and it cooked. What I never knew, and it still doesn't make sense
to me, was that the metal control panel is supposed to be isolated
electrically from the sockets... hence the plastic ones fitted!
WHO would EVER have guessed THAT?... not me! SO BE WARNED!
I have one piece of advice when booking your
amp in to a technician, ask if he does valve amps too, if he says no...
walk away. He might be highly qualified but if he doesn't understand VALVES,
he probably doesn't understand GUITAR amps at all!"
Pickup
Problems?
A note from Andy
Blake - THE PICKUP WIZARD ANSWERS!!
I am delighted to help Simon Jones with the
development of his terrific website by contributing some pickup type stuff.
So what do you do if your much-loved pickup
dies on you, pull it apart realise you can't do anything and throw it
away? No speak to Simon or better still contact Andy at www.wizardpickups.co.uk
I've been repairing, designing and making pickups
for more years than I care to remember, I am the UK's leading pickup repairer
and restorer and can name many leading Artistes and most shops and retail
outlets among my customers.
So why repair it?
-Well if you liked it's tone then why buy a new one that may not sound
the same plus it's nearly always cheaper to repair than buy new.
What if I want a different
sound? - No problem I can normally boost output or change the
tone just tell me exactly what you want.
I've read about RW/RP
what is it?- It actually stands for reverse wound / reverse
polarity and is most commonly found with single coil pickups like those
on a Strat. The middle pickup is RW/RP and when this is used with either
of the other two pickups it produces a hum-cancelling effect, making a
full rich warm and thick tone.
What are Alnico Vs?
- They are a type of magnet, Alnico/Nickel/CObalt , They are the type
of magnet used in most vintage humbuckers and give that full rounded tone.
Why do single coils
hum, is shielding any good? - This is probably the question
I'm asked most. Single coils hum because they allow unwanted electrical
interference to enter the electrical circuit of the guitar. There are
longer and more technical answers but that's the situation in a nutshell.
I've done a lot of work on shielding over the last couple of years with
one of the Universities in the US of A, and to summarise our findings
we have established that to prevent any hum from a single coil pickup
you'd need to shield the whole pickup inside a 10mm copper box! Then the
pickup wouldn't work anyway! But back to the point, well fitted shielding
does help, speak to Simon for details.
But Fender and Kinman
make quiet single coils as do many others - No they don't,
they make stacked humbuckers that sound similar to single coils but eliminate
the hum. But they don't sound exactly like true single coils and I've
had many customers returning this type of pickup as they sound too clinical
and characterless.
Can you make pickups?
- Yes, I make a standard range of Custom
Handwound pickups for most of the popular types of guitar. I can make
special one-offs and I've made pickups for double basses, violins, harps
and even for a set of Welsh Bagpipes! I do a lot of work developing new
designs and specifications for leading guitar manufacturers, if you've
an idea speak to me and we can discuss its merits and practicality.
Come back often and I'll slowly add more comments
to Simon's website when time permits, but as a passing thought, are pickups
important to electric guitars - WITHOUT THEM YOU'RE
PLAYING AN ACOUSTIC!
Bye for now, Andy Blake (The Pickup
Wizard)
So what's a setup?
Why
should I have to have my guitar set up?
It's a new guitar... it shouldn't need any setting
up... right?
WRONG!.... Unfortunately, in the UK at least,
guitars arrive from the distributors with no more than a "factory
set-up" which to quite honest, is usually of an appalling standard!
Sometimes they have a little tag with "inspected by: blah, blah...."
and "action on the first string at the 12th fret is...blah... blah..
blah..."
Well I'm afraid most of it is meaningless. With
the exception of a very few guitars, most are banged together at the factory,
the inspection card is stamped and ticked and on the wagon to good ol'
GB it goes! Some conscientious guitar shops will set-up all their guitars
before they go on sale.. but not many... and it's particularly rare amongst
the high volume turnover mail-order houses, so buyer beware! That mail
order bargain may not be such a bargain after all when you have just spent
the best part of fifty quid getting it all put right at your local guitar
repairer!
If your guitar is in need of fret attention,
this is NOT a fault of the shop you bought it from... it is surprisingly
common on nearly ALL guitars regardless of price as the factory set-up
is usually only good enough to make the instrument "playable"
but it's not necessarily perfect!
You could try asking your dealer if they can set the guitar up before
collection but bear in mind that nearly all shops advertise professional
set-ups but usually the work is just handed to the salesman who is "handiest
with the spanners". So expect many to charge extra for this service
if they get it done properly. Sometimes you may be able to negotiate for
the local professional guitar tech (me yet again!) to carry out the set-up
as part of the sale.
Remember that most shops DO NOT have a professional
"in shop" guitar tech.
As a general rule... these brands are usually
particularly well prepared straight from the factory:
- Fernandez - all models (excellent, almost
without exception)
- Gibson - USA models (v-good, but used to
be better)
- Fender - USA (Always been fairly good...
but even better now)
- Chinese Fender models (v-good, but used to be better)
- Jackson - Most models (v-good fretwork)
- Taylor Acoustics - (good... but surprisingly...
NOT as well set-up as they should be!)
- PRS - (well... what can you say... £££!)
- Guild - most models (v-good)
This list is
a new addition and will be updated and added to as circumstances change...
so keep in touch. The quality of set-up is not necessarily reflected by
the actual build quality.
i.e..
Chinese Fenders... CHEAP! but usually
surprisingly well made & set-up!
Taylor Acoustics... in my opinion,
the finest factory produced guitars on the planet and worth every penny...
but in need a small amount of setting up to put the icing on the cake!
So how
often should I have my guitar set up?
This is a difficult
one. Generally speaking, the more you play.. the more often it will need
a set-up. The harder the frets... the longer they will last between set-ups.
Most guitars, once set-up PROPERLY, and if played several times a week
will need a fresh set-up maybe every 12 -18 months. But some old Fenders
and Gibsons often come in to me for their FIRST set-up in 35 years...
and they are not that bad!
It also depends
on the type of wear you cause. If you move around the fretboard a lot
and bend strings a lot, the wear is very even and doesn't cause problems.
But if you play the same ol' few chords in the same place on the neck,
week in, week out... you will end up with notches in the frets that will
need skimming out... sometimes as often as every 3 to 6 months.
© |
